Note: The issues mentioned below may occur after you install Orchestrator 2016 UR4, or install later versions directly without installing UR4 first.
Issue 1
After upgrading Orchestrator to 2016 UR4 or 1801, you may get the following error message:
“Could Not Connect To The Specified Database Server”
or
“The Server Threw an Exception”
Resolution
To avoid that, install Microsoft SQL Server 2012 Native Client on your Orchestrator before installing the Update Rollup. It is a new prerequisite introduced by 2016 UR4, but hasn’t been well documented.
If you have already installed Update Rollup 4 and are getting that error, do the following on your Orchestrator.
Close Orchestrator
Install SQL Native Client if not installed already
Open Data Store Configuration
Enter your SQL server/instance info in the Server field, click Next
Confirm Data Store information is correct, click Finish
Re-open Orchestrator
Issue 2
You may get below error when accessing SCORCH web service after upgrading to UR4.
The server encountered an error processing the request. The exception message is ‘An error occurred while executing the command definition. See the inner exception for details.’. See server logs for more details. The exception stack trace is: at System.Data.EntityClient.EntityCommandDefinition.ExecuteStoreCommands(EntityCommand entityCommand, CommandBehavior behavior) at System.Data.EntityClient.EntityCommandDefinition.Execute(EntityCommand entityCommand, CommandBehavior behavior) at System.Data.EntityClient.EntityCommand.ExecuteReader(CommandBehavior behavior) at System.Data.EntityClient.EntityCommand.ExecuteScalar[T_Result](Func`2 resultSelector) at System.Data.Objects.ObjectContext.ExecuteFunction(String functionName, ObjectParameter[] parameters) at Microsoft.SystemCenter.Orchestrator.WebService.OrchestratorContext.OnContextCreated() at invoke_constructor() at System.Data.Services.DataService`1.CreateDataSourceInstance() at System.Data.Services.DataService`1.CreateProvider() at System.Data.Services.DataService`1.HandleRequest() at System.Data.Services.DataService`1.ProcessRequestForMessage(Stream messageBody) at SyncInvokeProcessRequestForMessage(Object , Object[] , Object[] ) at System.ServiceModel.Dispatcher.SyncMethodInvoker.Invoke(Object instance, Object[] inputs, Object[]& outputs) at System.ServiceModel.Dispatcher.DispatchOperationRuntime.InvokeBegin(MessageRpc& rpc) at System.ServiceModel.Dispatcher.ImmutableDispatchRuntime.ProcessMessage5(MessageRpc& rpc) at System.ServiceModel.Dispatcher.ImmutableDispatchRuntime.ProcessMessage11(MessageRpc& rpc) at System.ServiceModel.Dispatcher.MessageRpc.Process(Boolean isOperationContextSet)
Resolution
To resolve the issue, run below queries on Orchestrator DB to grant EXECUTE and SELECT permission to Orchestrator Operators.
1
2
GRANTEXECUTEON object::[Microsoft.SystemCenter.Orchestrator].[GetSecurityToken] TO [Microsoft.SystemCenter.Orchestrator.Operators] GRANTSELECTON object::[Microsoft.SystemCenter.Orchestrator.Internal].[Settings] TO [Microsoft.SystemCenter.Orchestrator.Operators]
# 替换*adminusername*为你的数据库用户名 $ mysql -u *adminusername* -p Enter password: Welcome to the MySQL monitor. Commands end with ; or \g. Your MySQL connection id is 5340 to server version: 3.23.54 Type 'help;' or '\h'forhelp. Type '\c' to clear the buffer.
# 替换dabasename, wordpressusername, hostname和password。hostname通常是localhost mysql> GRANT ALL PRIVILEGES ON databasename.* TO "wordpressusername"@"hostname" -> IDENTIFIED BY "password"; Query OK, 0 rows affected (0.00 sec) mysql> FLUSH PRIVILEGES; Query OK, 0 rows affected (0.01 sec) mysql> EXIT Bye $
下面是我替换关键内容后的范例:
1 2 3 4 5 6 7 8 9 10 11 12 13 14 15
$ mysql -u root -p Enter password: Welcome to the MySQL monitor. Commands end with ; or \g. Your MySQL connection id is 5340 to server version: 3.23.54 Type 'help;' or '\h'forhelp. Type '\c' to clear the buffer. mysql> CREATE DATABASE blogdb; Query OK, 1 row affected (0.00 sec) mysql> GRANT ALL PRIVILEGES ON blogdb.* TO "wendi"@"localhost" -> IDENTIFIED BY "mypassword"; Query OK, 0 rows affected (0.00 sec) mysql> FLUSH PRIVILEGES; Query OK, 0 rows affected (0.01 sec) mysql> EXIT Bye $
#【更改点3】在index.html前加上index.php,以支持WordPress # Add index.php to the list if you are using PHP index index.php index.html index.htm index.nginx-debian.html;
#【更改点4】替换“_”为我们申请好的域名 server_name www.wendicai.net; location / { # First attempt to serve request as file, then # as directory, then fall back to displaying a 404. try_files $uri$uri/ =404; }
#【更改点5】取消此部分注释,因为WordPress需要用到PHP。如果安装的PHP版本不是7.0,需要手动改下版本号 # pass the PHP scripts to FastCGI server listening on 127.0.0.1:9000 # location ~ \.php$ { include snippets/fastcgi-php.conf; # # # With php7.0-cgi alone: # fastcgi_pass 127.0.0.1:9000; # # With php7.0-fpm: fastcgi_pass unix:/run/php/php7.0-fpm.sock; }
# deny access to .htaccess files, if Apache's document root # concurs with nginx's one # location ~ /\.ht { deny all; } }
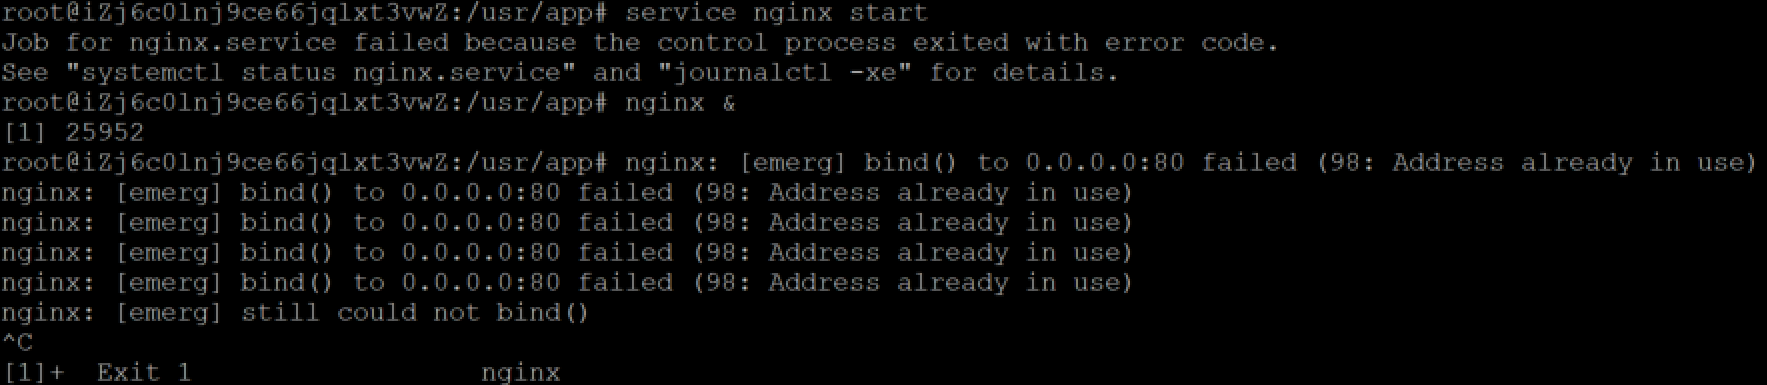
“nginx: [emerg] bind() to 0.0.0.0:80 failed (98: Address already in use)”
Nginx安装完成后,启动Nginx失败并出现以下报错
这是因为80端口被其他服务占用。可以通过以下命令来检查:
1
lsof -i:80
我的情况是云服务器本身预装了apache,从结果中可以看出80端口被apaceh2占用。
将apache2服务停掉后,成功启动Nginx。
主题、插件等“安装失败:无法创建目录”
用以下命令添加权限:
1
chmod -R 777 /var/www/www.wendicai.net # 网站根目录
“在裁剪您的图像时发生了错误”
在WordPress中裁剪图片时,报错“在裁剪您的图像时发生了错误”。
这是由于PHP的GD库未安装。运行以下命令安装:
1
apt-get install php7.2-gd
设置中英文摘要长度
在外观->主题编辑器中找到functions.php,在末尾加上以下代码。
中文摘要(替换“100”为你想要的长度):
1 2 3 4 5 6 7 8 9 10
functioniesay_filter_chinese_excerpt($output) { global$post; //check if its chinese character input $chinese_output = preg_match_all("/\p{Han}+/u", $post->post_content, $matches); if($chinese_output) { $output = mb_substr( $output, 0, 100 ) . '...'; } return$output; } add_filter( 'get_the_excerpt', 'iesay_filter_chinese_excerpt' );
英文摘要(替换“50”为你想要的长度)
1 2 3 4 5 6 7 8 9 10
functionie_longer_excerpts($length) { // Don't change anything inside /wp-admin/ if ( is_admin() ) { return$length; } // Set excerpt length to 50 words return50; } // "999" priority makes this run last of all the functions hooked to this filter, meaning it overrides them add_filter( 'excerpt_length', 'ie_longer_excerpts', 999 );