小龙虾养成笔记(一):用 OpenClaw 搭一个有记忆的 AI Agent

用过 ChatGPT 的人都有过这种体验:每次打开新对话,又得从头介绍一遍”我是谁、我在做什么、我上次跟你说过什么”。对话结束,一切归零。

这不是 AI 不够聪明,而是 LLM 天生无状态——session 结束就失忆。

OpenClaw 解决的就是这个问题。它不是又一个聊天界面,而是一套让 LLM 变成持久化 Agent 的框架:有记忆、有闹钟、有手脚,关掉窗口它还在。

和OpenClaw折腾了有段时间了,打算记录一下我的个人使用心得。本文作为第一篇,重点聊两件事:怎么让它记住东西,以及怎么让它自己动起来


1. 架构速览 🏗️

先看全貌。OpenClaw 的核心组件:

1
2
3
4
5
6
7
8
9
10
11
Gateway(常驻进程)
├── Agent(你的 AI 助手)
│ ├── Workspace(文件系统 = 状态)
│ │ ├── SOUL.md ← 身份定义
│ │ ├── USER.md ← 用户画像
│ │ ├── MEMORY.md ← 长期记忆
│ │ └── memory/ ← 每日日志
│ ├── Skills(可插拔能力模块)
│ └── Cron(定时任务)
├── Channel(飞书 / Discord / Telegram)
└── Session(一次对话)

几个关键设计决策:

  • 文件系统即状态。记忆就是 markdown 文件,不需要向量数据库,cat 就能看,git 就能版本管理。
  • Gateway 常驻。不是”用的时候启动”,而是一直在跑。这样 cron 任务和心跳才有意义。
  • Skill 热插拔。新能力以 SKILL.md 的形式挂载,不改代码,重启即生效。

2. 持久化记忆:三层架构 🧠

这是我觉得 OpenClaw 最优雅的设计。记忆分三层,各司其职:

第一层:SOUL.md — 我是谁

1
2
3
4
5
# SOUL.md
_You're not a chatbot. You're becoming someone._

## Vibe
随意、轻松、像朋友聊天。不端着,不啰嗦。用中文交流。

这个文件定义 Agent 的”人格”。每次 session 启动时自动加载,所以它永远知道自己是谁。不需要你每次提醒”你是一个轻松风格的助手”。

第二层:MEMORY.md — 长期记忆

1
2
3
4
5
6
7
8
9
10
11
12
# 长期记忆

## 关于用户
- 时区 UTC+8
- 喜欢简洁的交流风格

## 环境
- 运行在 WSL2 (Ubuntu) on Windows

## 教训
- 安装 skill 后需要重启 gateway 才能刷新
- 不同 agent 发飞书消息要用各自的 accountId

这是你与小龙虾的每一次互动后沉淀下来的精华。不是对话记录的堆砌,而是从日常交互中提炼出来的重要信息。为了确保MEMORY.md能及时更新,我设置了一个每日反思任务,让我的龙虾在每天晚上回顾过去24小时的对话,将关键内容存入MEMORY.md。

1
2
3
4
【每日自我反思】
...
3. 记忆维护:回顾过去24小时对话(sessions_list + sessions_history),关键内容归入 MEMORY.md;清理过时内容
...

第三层:memory/YYYY-MM-DD.md — 每日日志

1
2
3
4
5
6
7
8
# 2026-03-21 (周六)

## 完成的事情
- 迁移了 quantified_self 数据格式
- 封装了 agent-learn skill

## 学习的内容
- 学了《段永平投资问答录》,笔记在 brain/投资/books/

这是小龙虾的日记,记录与你交流的内容的要点总结,按天存储。只有今天和昨天的会被加载到 session context 里,不会把所有历史都塞进去。

Compaction:对话压缩机制

Session 的上下文窗口是有限的。聊久了怎么办?

OpenClaw 用了 compaction 机制。当对话超过一定长度时,系统会把前面的对话压缩成一段摘要,释放 token 空间。但压缩前会触发一个 pre-compaction flush——给 Agent 一个机会把重要信息写到文件里。

1
2
3
4
5
6
对话进行中...
↓ 上下文快满了
↓ 触发 pre-compaction flush
↓ Agent 把关键信息写入 memory/2026-03-21.md
↓ 压缩旧对话为摘要
↓ 继续对话

但实测下来,自动compaction可能会导致最近一两回合对话的信息丢失(可能因为这部分对话正好卡在了pre-compaction flush和compaction之间)。如果这部分对话正好包含关键信息的话,龙虾“失忆”的现象就会特别明显。

所以我在 AGENTS.md 里加了一条规则:做完就记 memory,不等 pre-compaction flush。因为 compaction 随时可能发生,重要的东西要立刻落盘。


3. 自主调度:Cron + Heartbeat ⏰

有了记忆,Agent 不会失忆了。但它还是被动的——你不说话它就歇着。

Cron:定时任务

OpenClaw 内置了 cron 系统。每个 cron 任务在独立的 session 里运行,互不干扰。

1
2
3
4
5
6
7
# 创建一个每天 22:00 执行的反思任务
openclaw cron create \
--name "self-reflect" \
--schedule "0 22 * * *" \
--timezone "Asia/Shanghai" \
--agent main \
--message "回顾今天的对话,记录教训,更新记忆..."

例如,我现在跑着这些 cron:

时间 任务 做什么
19:00 learn 从知识库学习新文章
22:00 self-reflect 每日反思
23:00 ai-daily-news 自动生成 AI 日报
23:20 investment-analysis 对给定标的进行分析并给出投资建议

Heartbeat:心跳巡查

Cron 是精确定时,Heartbeat 是模糊轮询。Gateway 每隔一段时间 ping 一下 Agent,Agent 决定要不要做点什么。

适合心跳的场景:批量检查(邮件+日历+通知一起看)、不需要精确时间的巡查、比较轻量级的任务。

适合 cron 的场景:精确时间、需要隔离的 session、需要指定不同 model 的任务。

我目前还没有找到需要Heartbeat的场景,因此我的HEARTBEAT.md 里就一行:

1
无需执行任何操作。

4. Skill:可复用的能力封装 🔧

当你发现多个 Agent 在 cron prompt 里写着差不多的逻辑时,就该封装成 Skill 了。

封装前:每个 cron 写一大段 prompt

1
2
3
4
5
6
7
8
9
10
11
investment-learn 的 prompt(25 行):
1. 读取 brain/.notion-manifest.json...
2. 读取 data/learned-articles.json...
3. 筛选 tagDir 为 "投资" 的文章...
...

job-coach-learn 的 prompt(25 行):
1. 读取 brain/.notion-manifest.json... ← 重复!
2. 读取 data/learned-articles.json... ← 重复!
3. 筛选 tagDir 为 "求职" 的文章...
...

封装后:一个 Skill + 参数化调用

SKILL.md(定义一次):

1
2
3
4
5
6
7
8
9
---
name: agent-learn
description: Agent 知识学习 skill。从多个数据源学习新内容。
---
## 参数
| 参数 | 说明 |
|------|------|
| brain_tag | 知识库的 tagDir 名称 |
| drive_folder_token | 飞书云文档文件夹(可选)|

cron prompt(精简到 3 行):

1
2
3
按 agent-learn skill 学习新内容。参数:
- brain_tag: 投资
- drive_folder_token: XXX

Skill 的三级加载机制也值得一提:

  1. Metadata(name + description)— 始终在 context 里,~100 词
  2. SKILL.md body — 匹配到才加载,<5k 词
  3. references/ 和 scripts/ — 按需读取,不限大小

这保证了:装 20 个 Skill 不会撑爆 context,只有用到的才会加载。


养虾一段时间,最直观的感受是:它开始像一个”人”了。不是说它有多聪明,而是更像一个身边的伙伴——知道昨天发生了什么,记得我给过的反馈,懂得我的喜好,具有主观能动性(会自我反思和主动干活)。

当然坑也踩了不少,也没少花时间在给龙虾“治病”上。但这正是学习的过程与折腾的乐趣所在。

Kubernetes 故障排查:API Server 无法连接与 CRI-Dockerd 开机自动启动失败

1. 问题现象

在部署 Kubernetes v1.24+ 版本(如 v1.35)并使用 Docker 作为运行时环境时,重启 Master 节点后,执行 kubectl get nodes 出现连接被拒绝的报错:

1
E0123 06:25:39.253691    5936 memcache.go:265] "Unhandled Error" err="couldn't get current server API group list: Get \"https://master:6443/api?timeout=32s\": dial tcp 192.168.109.100:6443: connect: connection refused"

进一步排查 kubelet 服务日志 (journalctl -xefu kubelet),发现关键报错:

Error while dialing: dial unix /var/run/cri-dockerd.sock: connect: no such file or directory

检查 cri-dockerd 服务状态时,发现服务未启动。但其实我是配置了cri-dockerd服务开机自动启动的,所以这里的主要问题是为什么自动启动失败。

进一步查看报错,提示 Socket 无法加载主服务:

1
2
systemd[1]: cri-docker.socket: Socket service cri-docker.service not loaded, refusing.
systemd[1]: Failed to listen on cri-docker.socket.

2. 原因分析

  1. API Server 无法连接的原因:Kubernetes v1.24+ 移除了 Dockershim,使用 Docker 必须通过 cri-dockerd 中间件。如果 cri-dockerd 未运行,Kubelet 就无法驱动 Docker,导致 API Server 容器无法启动。
  2. cri-dockerd 服务启动失败的原因cri-dockerd 通常配置为 Socket Activation 模式。这意味着 cri-dockerd.socket 负责创建 /var/run/cri-dockerd.sock 文件并监听请求,收到请求后才拉起 cri-dockerd.service。如果 Socket 没启动,Kubelet 就找不到 sock 文件。
  3. Socket未启动的原因
    • 命名不一致:Socket 文件配置了 PartOf=cri-dockerd.service,但文件系统中只有 cri-docker.service(少了个 d),导致 Systemd 找不到依赖服务。
    • 语法错误:Systemd Unit 文件中不支持行内注释(如 Requires=xxx # 注释),这会导致整行解析失败,依赖关系失效。

3. 解决方案

1. 先停止并禁用可能存在的旧服务,避免冲突

1
2
3
4
5
systemctl stop cri-docker.socket cri-docker.service
systemctl disable cri-docker.socket cri-docker.service
# 如果文件存在,删除它们
rm -f /etc/systemd/system/cri-docker.socket
rm -f /etc/systemd/system/cri-docker.service

2.规范化服务名称与配置

为了避免混淆,建议统一将 Service 和 Socket 文件命名为 cri-dockerd(带 d)。

修复 Service 文件 (/etc/systemd/system/cri-dockerd.service):
注意:去掉所有行内注释,确保无多余换行。

1
2
3
4
5
6
7
8
9
10
11
12
13
14
15
16
17
18
19
20
21
22
23
24
[Unit]
Description=CRI Interface for Docker Application Container Engine
Documentation=https://docs.mirantis.com
After=network-online.target firewalld.service docker.service
Wants=network-online.target
Requires=cri-dockerd.socket

[Service]
Type=notify
ExecStart=/usr/local/bin/cri-dockerd --pod-infra-container-image=registry.cn-hangzhou.aliyuncs.com/google_containers/pause:3.10 --network-plugin=cni --cni-conf-dir=/etc/cni/net.d --cni-bin-dir=/opt/cni/bin --container-runtime-endpoint=unix:///var/run/cri-dockerd.sock --docker-endpoint=unix:///var/run/docker.sock --cri-dockerd-root-directory=/var/lib/docker
ExecReload=/bin/kill -s HUP $MAINPID
TimeoutSec=0
RestartSec=2
Restart=always
StartLimitBurst=3
StartLimitInterval=60s
LimitNOFILE=infinity
LimitNPROC=infinity
LimitCORE=infinity
TasksMax=infinity
Delegate=yes
KillMode=process
[Install]
WantedBy=multi-user.target

修复 Socket 文件 (/etc/systemd/system/cri-dockerd.socket):
注意:PartOf 必须严格匹配 Service 的文件名。

1
2
3
4
5
6
7
8
9
10
11
12
[Unit]
Description=CRI Docker Socket for the API
PartOf=cri-dockerd.service

[Socket]
ListenStream=/var/run/cri-dockerd.sock
SocketMode=0660
SocketUser=root
SocketGroup=docker

[Install]
WantedBy=sockets.target

3. 重新加载并启动

如果之前存在不一致的文件(如 cri-docker.service),需要清理掉,避免 Systemd 冲突。

1
2
3
4
5
6
# 重新加载配置
systemctl daemon-reload

# 启动顺序:先 Socket 后 Service
systemctl enable --now cri-dockerd.socket
systemctl enable --now cri-dockerd.service

4. 验证状态

1
systemctl status cri-dockerd.socket

如果这个是 Active (running),那么 /var/run/cri-dockerd.sock 就会存在,kubelet也就能正常连接了。

5. 最后重启Kubelet

1
systemctl restart kubelet

参考掘金 K8s 部署教程时的防踩坑经验分享

最近在学习 Kubernetes,在掘金上看到一篇部署教程:Kubernetes v1.35 部署实战

这篇文章讲解得非常清晰,实操性也很强,推荐给想学习搭建 K8s 集群的同学们。

不过,在跟随教程实操的过程中,我遇到了一些配置上的细节问题。为了帮助大家更顺畅地完成部署,我总结了这份经验分享,作为原教程的补充。

注:如果已经遇到了cri-dockerd相关服务开机启动失败的问题,可参考 Kubernetes 故障排查:API Server 无法连接与 CRI-Dockerd 开机自动启动失败 解决。


1. Systemd 配置文件细节

原文提供了详细的 cri-dockerd 服务配置模板。但在直接使用时,需要注意一些细节。

1.1 避免行内注释

问题
/etc/systemd/system/cri-dockerd.service/etc/systemd/system/cri-docker.socket 配置文件中如果包含类似 Requires=cri-docker.socket # 依赖socket 这样的行内注释,Systemd 可能会解析失败,报错 Failed to add dependency on #...

1
2
# /etc/systemd/system/cri-dockerd.service:
Requires=cri-docker.socket # 以前的文件名注释
1
2
# /etc/systemd/system/cri-docker.socket:
PartOf=cri-docker.service #systemd cri-docker.servics 文件名

解决
Systemd 的 Unit 文件通常不支持在参数值后直接加 # 进行注释。建议直接删除注释。

1.2 注意长命令换行

/etc/systemd/system/cri-dockerd.service 中的 ExecStart 命令较长,在 pause:3.10 后有一个多余的换行。在复制时,需要删除这个换行,否则会导致命令截断。


2. 文件名一致性问题

在配置过程中,容易混淆 cri-dockercri-dockerd(是否带 d)。

问题
如果 Socket 文件中配置了 PartOf=cri-dockerd.service,但实际创建的服务文件名为 cri-docker.service,会导致 Socket 启动后无法正确拉起主服务,Kubelet 也会报错找不到文件。

建议
保持 Socket 文件和 Service 文件命名的一致性。

我采用的统一命名为:

  • /etc/systemd/system/cri-dockerd.service
  • /etc/systemd/system/cri-dockerd.socket

并在 cri-dockerd.service 文件中指定:

1
2
[Unit]
Requires=cri-dockerd.socket

cri-dockerd.socket 文件中指定:

1
2
[Unit]
PartOf=cri-dockerd.service

3. kubeadm 初始化配置

在原教程 4.6.2 执行kubeadm init命令 章节中,涉及到 --control-plane-endpoint 字段的配置。

问题
如果照抄配置文件中的 --control-plane-endpoint=k8smaster 而没有修改,或者将其设置为一个无法解析的域名,kubeadm init 将会失败,提示无法连接到 API Server。

建议
controlPlaneEndpoint 必须是一个可解析、可访问的地址,指向 Master 节点的 IP 或域名。

  • 推荐做法:将其设置为 Master 节点的主机名(例如 master)或直接使用 Master 节点的 IP 地址。
  • 前提条件:如果使用主机名,必须确保该主机名可被解析(如在 /etc/hosts 文件中已经配置了正确的域名解析: 192.168.109.100 master)。

4. 小结

以上就是我在使用该教程部署时遇到的一些细节问题。原教程提供了很好的整体步骤,希望这些配置细节可以帮大家避免不必要的排查时间。

SCORCH - SCOM IP – "Failed to connect. Please verify your connection settings."

Issue Definition

After regsitering and deploying SCOM Integration Pack (IP) in Orchestrator, we need to configure a connection to specify link to your SCOM management server (Refer to Configure the connection).

However, when you click on the Test Connection button, you might receive the error “Failed to connect. Pleae verify your connection settings.”

Troubleshooting Tips

Verify Configurations

  • Ensure the account we use for connection a member of local Administrator on the SCOM server and a member of Operations Manager Administrators user role.

  • (Only for SCOM 2012 IP) A SCOM console of the same version must be installed on the server that hosts the Runbook Designer. And we should be able to connect to SCOM server from the console with the same account.

    Note: SCOM 2016 IP no longer requires SCOM console to be installed on Runbook Designer.

  • Check whether TLS 1.0 is disabled on SCOM management server and SCORCH server.

    We have a known issue that connection fails with the same error in SCORCH 2016 + SCOM 2016 environment with TLS 1.0 disabled. If TLS 1.0 is disabled in your environment, try enabling it an testing the connection again.

  • Ensure .Net Framwork 3.5 is installed.

Installing .Net Framework 3.5 with PowerShell

Enable .NET Framework 3.5 by using the Add Roles and Features Wizard

Network Trace

If all configurations above are verified, we can use Network Monitor to capture a network trace and see what causes the failure.

Pay attention to Kerberos records. If there is Kerberos error, check if SCOM SPN is correct: OpsMgr 2012: What should the SPN’s look like?

Here is an example of Kerberos error in network trace. The error is KererosV5:KRB_ERROR -KDC_ERR_S_PRINCIPAL_UNKNOWN(7) and indicates an SPN issue.

SCOM - SQL DB Engine Discovery Mechanism on Cluster

In summary

  • For any SQL DB Engine on cluster to be discovered, firstly ensure the SQL Server Network Name is already discovered in “Agentless Managed”.

  • If not, check if there is any orphaned resource in Windows Cluster.

Details

For SQL DB Engine on Cluster, the discovery is expected to run on 3 objects.

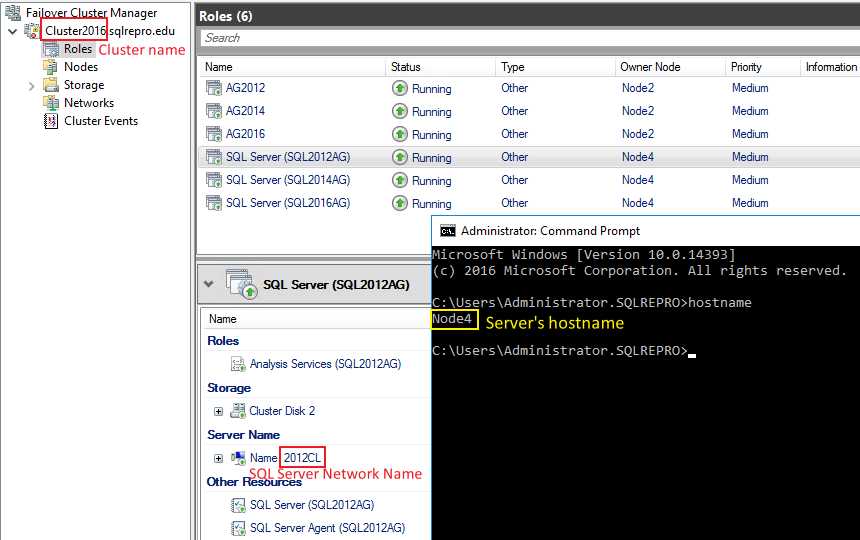
  • SQL Server Network Name (You can find the name in Failover Cluster Manager -> Cluster Name -> Roles -> Server Name)
  • Cluster Name (The cluster name in Failover Cluster Manager)
  • Server Name of the Node

Only the execution on SQL Server Network Name returns instances on it. Execution on the other 2 objects will show successful, but won’t return any discovered instance. That’s expected.

In SCOM ETL Trace:

Execution on 2012CL (SQL Server Network Name):

[1]24232.8364::12/26/2019-18:52:44.977 [ExecutionManager] [] [Information] :CTaskTracker::TaskCompleted{tasktracker_cpp1514}Notifying creator of task completion for task 6446, completion reason 0x0, task result is SUCCESS, task output is 00{bb187d3c-1218-6f43-b6f6-0a0695b96bd7}{e12d4b62-8f91-0b5e-e583-47789cae70dc}

MachineName2012CL.sqlrepro.eduInstanceNameSQL2012AGDisplayNameResource Pool Group
PrincipalName2012CL.sqlrepro.eduMachineName2012CL.sqlrepro.eduInstanceNameSQL2012AG
MachineName2012CL.sqlrepro.eduNetbiosComputerName2012CLNetbiosDomainNameSQLREPROInstanceNameSQL2012AGDisplayName2012CL\SQL2012AGConnectionString2012CL.sqlrepro.edu\SQL2012AGEditionEnterprise EditionInstanceIDMSSQL11.SQL2012AGLanguage1033Version11.0.2100.60ServiceNameMSSQL$SQL2012AGServiceClusterNameSQL SERVER (SQL2012AG)ClusterTruePerformanceCounterObjectMSSQL$SQL2012AGAuthenticationModeWindows Authentication ModeFullTextSearchServiceNameMSSQLFDLauncher$SQL2012AGFullTextSearchServiceClusterNameSQL Full-text Filter Daemon Launcher (SQL2012AG)AgentNameSQLAgent$SQL2012AGTypeDB EngineAgentClusterNameSQL SERVER AGENT (SQL2012AG)MasterDatabaseLocationT:\MSSQL11.SQL2012AG\MSSQL\DATA\master.mdfMasterDatabaseLogLocationT:\MSSQL11.SQL2012AG\MSSQL\DATA\mastlog.ldfErrorLogLocationT:\MSSQL11.SQL2012AG\MSSQL\Log\ERRORLOGServicePackVersion0AuditLevelFailureInstallPathC:\Program Files\Microsoft SQL Server\MSSQL11.SQL2012AG\MSSQLToolsPathC:\Program Files\Microsoft SQL Server\110\ToolsEnableErrorReportingFalseAccountsqlrepro\sqlsvcPrincipalName2012CL.sqlrepro.eduMonitoringTypeLocal


MachineName2012CL.sqlrepro.eduInstanceNameSQL2012AG
PrincipalName2012CL.sqlrepro.edu
PrincipalName2012CL.sqlrepro.eduMachineName2012CL.sqlrepro.eduInstanceNameSQL2012AG

.

Execution on Cluster2016 (Cluster Name):

[3]24232.8364::12/26/2019-18:53:05.985 [ExecutionManager] [] [Information] :CTaskTracker::TaskCompleted{tasktracker_cpp1514}Notifying creator of task completion for task 6448, completion reason 0x0, task result is SUCCESS, task output is 00{bb187d3c-1218-6f43-b6f6-0a0695b96bd7}{124369dd-8822-2f6b-9ce7-9a1b06551b24}
# No SQL instance is returned here

.

Execution on Node4 (Server Name of the Node):

[1]24232.10072::12/26/2019-18:51:54.710 [ExecutionManager] [] [Information] :CTaskTracker::TaskCompleted{tasktracker_cpp1514}Notifying creator of task completion for task 6441, completion reason 0x0, task result is SUCCESS, task output is 00{bb187d3c-1218-6f43-b6f6-0a0695b96bd7}{264b2a65-07f0-8cce-8757-b309a2bc20b8}
# No SQL instance is returned here

.

The 3 GUIDs in the trace are the BME IDs of the 3 objects:

If you check SCOM trace and find the discovery didn’t run on SQL Server Network Name, the first thing is to check whether the discovery target is already discovered in SCOM Console -> Monitoring -> Discovered Inventory -> . An object with the SQL Server Network Name is probably missing there.

  • Tracing the discovery chain to the source, if the SQL Server Network Name is already discovered and shows up in Agentless Managed, we need to troubleshoot the SQL discovery itself.
  • Otherwise, if the SQL Server Network Name doesn’t show up in Agentless Managed, the issue is actually a Windows Cluster discovery issue.

For the Windows Cluster discovery issue, I followed below steps to resolve it.

  1. [VERY IMPORTANT] Confirm agent proxy is enabled on the agents.

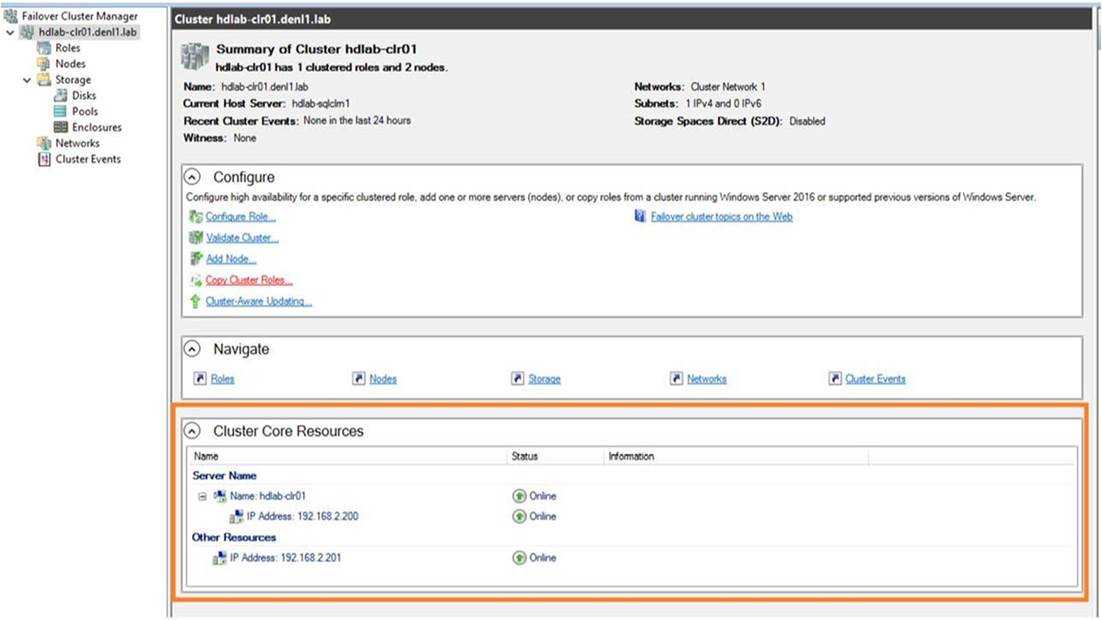
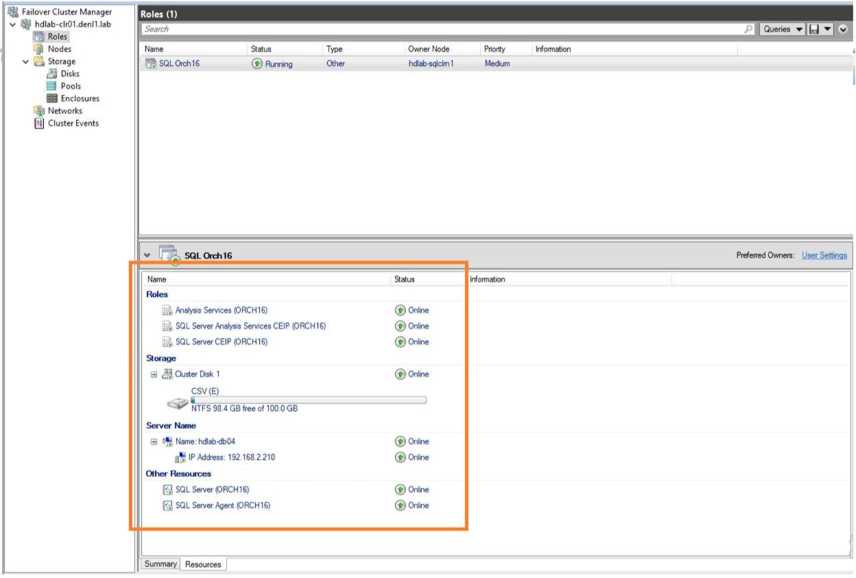
  2. Check if the cluster has any orphaned resource blocking the cluster discovery.

    a. Run this PowerShell command to check if there is any offline resources that had been removed from cluster manager.

    1
    get-clusterresource | where {$_.state -eq 'offline'}

    b. Run this PowerShell command. Compare the result with the resources in Failover Cluster Manager to find out if there is any orphaned resource.

    1
    get-clusterresource | sort-object -Property ResourceType

    All the resources returned by the command should be found in below areas in Failover Cluster Manager. Otherwise, there is an orphaned resource.

    If any orphaned resource is found, use this command to remove the resource.

    1
    Remove-ClusterResource -Name "<Name of the resource>" -Force

    After that, flush health service cache on the node and monitor for some time. If it goes well, the SQL Server Network Name and the Cluster Name Object should occur in Agentless Managed, then the SQL DB engines should be discovered gradually.

Reference

SCOM Won’t Discover My SQL Server (Or Cluster)

Cluster not appearing in Agentless Managed

Discovery for MS Clusters of Any Kind

Fail to connect to Orchestrator Web Service

Error Message

The same error may occur after applying SCORCH 2016 UR4 and later versions. See Tips and Tricks for Applying SCORCH 2016 UR4 and Later Versions.

Request Error

The server encountered an error processing the request. The exception message is ‘An error occurred while executing the command definition. See the inner exception for details.’. See Server logs for more details. The exception stack trace is:

at System.Data.EntityClient.EntityCommandDefinition.ExecuteStoreCommands(EntityCommand entityCommand, CommandBehavior behavior)
at System.Data.EntityClient.EntityCommandDefinition.Execute(EntityCommand entityCommand, CommandBehavior behavior)
at System.Data.EntityClient.EntityCommand.ExecuteReader(CommandBehavior behavior)
at System.Da.EntityCIient.EntityCommand.ExecuteScalar[T_Result](Func`2 resultSelector)
at System.Data.Objects.ObjectContext.ExecuteFunction(String functionName, ObjectParameter[] parameters)
at Microsoft.SystemCenter.Orchestrator.WebService.OrchestratorContext.ComputeAuthorizationCache(NuIlable`1 tokenld)
at Microsoft.SystemCenter.Orchestrator.WebService.OrchestratorContext.OnContextCreated()
at invoke_constructor()
at System.Data.Services.DataService`1.CreateProvider()
at System.Data.Services.DataService`1.HandleRequest()
at System.Data.Services.DataService`1.ProcessRequestForMessage(Stream messageBody)
at SynclnvokeProcessRequestForMessage(Object, Object[], Object[])
at System.ServiceModel.Dispatcher.SyncMethodInvoker.Invoke(Object instance, Object[] inputs, Object[]& outputs)
at System.ServiceModel.Dispatcher.DispatchOperationRuntime.InvokeBegin(MessageRpc& rpt)
at System.ServiceModel.Dispatcher.ImmutableDispatchRuntime.ProcessMessage5(MessageRpc& rpc)
at System.ServiceModel.Dispatcher.ImmutableDispatchRuntime.ProcessMessage31(MessageRpc& rpc)
at System.ServiceModel.Dispatcher.MessageRpC.Process(Boolean isOperationContextSet)at System.ServiceModel.Dispatcher.MessageRpC.Process(Boolean isOperationContextSet)

Troubleshooting

This error usually indicates some issues in the Orchestrator DB.

  1. Ensure Orchestrator DB disk space is enough.
  2. Run below queries on Orchestrator DB to ensure enough permission, and try again.
1
2
GRANT EXECUTE ON object::[Microsoft.SystemCenter.Orchestrator].[GetSecurityToken] TO [Microsoft.SystemCenter.Orchestrator.Operators]
GRANT SELECT ON object::[Microsoft.SystemCenter.Orchestrator.Internal].[Settings] TO [Microsoft.SystemCenter.Orchestrator.Operators]
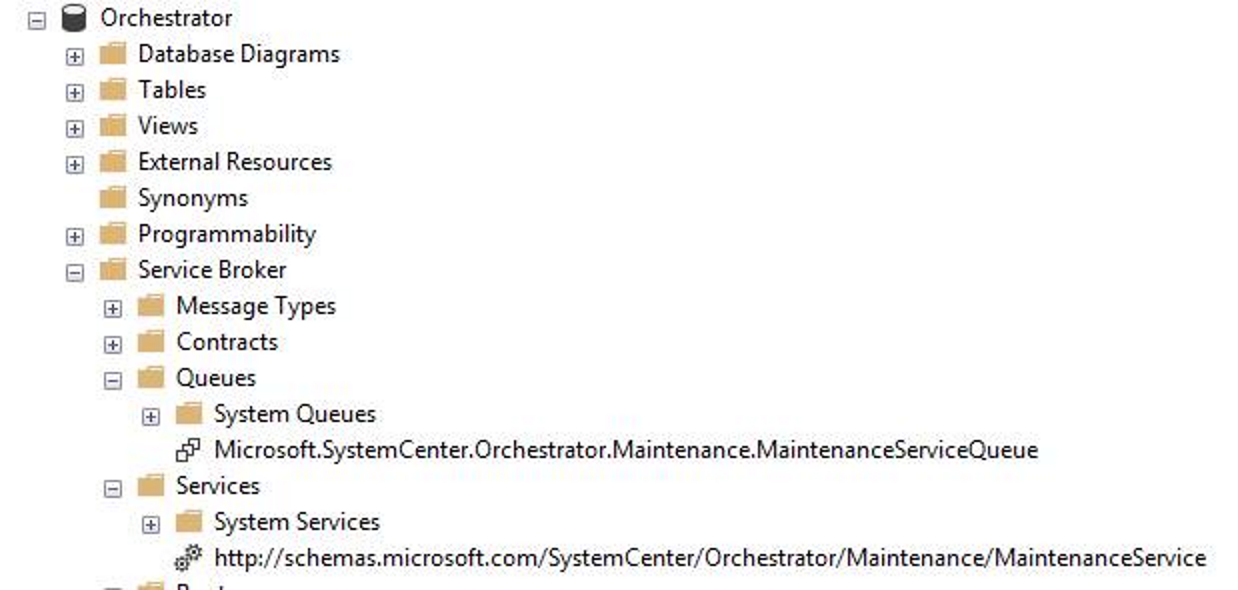
  1. Check whether the service http://schemas.microsoft.com/SystemCenter/Orchestrator/Maintenance/MaintenanceService and queue [Microsoft.SystemCenter.Orchestrator.Maintenance].[MaintenanceServiceQueue] are there in Orchestrator DB. If they are missing, we need to create them manually.

  1. If the issue only occurred recently and we have a backup of the Orchestrator DB prior to this issue, we can restore the backup as a quick solution.

Log Analysis

Use procdump to display the exception.

1
Procdump -e 1 -f "" <PID of w3wp.exe>

Below is an example output.

[00:28:10] Exception: E0434F4D.System.Configuration.ConfigurationErrorsException (“This element is not currently associated with any context”)
[00:28:10] Exception: E0434F4D.System.Data.SqlClient.SqlException (“The SELECT permission was denied on the object ‘Settings’, database ‘Orchestrator’, schema ‘Microsoft.SystemCenter.Orchestrator.Internal’.”)
[00:28:10] Exception: E0434F4D.System.Data.SqlClient.SqlException (“The SELECT permission was denied on the object ‘Settings’, database ‘Orchestrator’, schema ‘Microsoft.SystemCenter.Orchestrator.Internal’.”)
[00:28:10] Exception: E0434F4D.System.Data.SqlClient.SqlException (“The SELECT permission was denied on the object ‘Settings’, database ‘Orchestrator’, schema ‘Microsoft.SystemCenter.Orchestrator.Internal’.”)
[00:28:10] Exception: E0434F4D.System.Data.SqlClient.SqlException (“The SELECT permission was denied on the object ‘Settings’, database ‘Orchestrator’, schema ‘Microsoft.SystemCenter.Orchestrator.Internal’.”)
[00:28:10] Exception: E0434F4D.System.Data.SqlClient.SqlException (“The EXECUTE permission was denied on the object ‘GetSecurityToken’, database ‘Orchestrator’, schema ‘Microsoft.SystemCenter.Orchestrator’.”)
[00:28:10] Exception: E0434F4D.System.Data.SqlClient.SqlException (“The EXECUTE permission was denied on the object ‘GetSecurityToken’, database ‘Orchestrator’, schema ‘Microsoft.SystemCenter.Orchestrator’.”)
[00:28:10] Exception: E0434F4D.System.Data.SqlClient.SqlException (“The EXECUTE permission was denied on the object ‘GetSecurityToken’, database ‘Orchestrator’, schema ‘Microsoft.SystemCenter.Orchestrator’.”)
[00:28:10] Exception: E0434F4D.System.Data.SqlClient.SqlException (“The EXECUTE permission was denied on the object ‘GetSecurityToken’, database ‘Orchestrator’, schema ‘Microsoft.SystemCenter.Orchestrator’.”)
[00:28:10] Exception: E0434F4D.System.Data.EntityCommandExecutionException (“An error occurred while executing the command definition. See the inner exception for details.”)
[00:28:10] Exception: E0434F4D.System.Data.EntityCommandExecutionException (“An error occurred while executing the command definition. See the inner exception for details.”)
[00:28:10] Exception: E0434F4D.System.Data.EntityCommandExecutionException (“An error occurred while executing the command definition. See the inner exception for details.”)
[00:28:10] Exception: E0434F4D.System.Data.EntityCommandExecutionException (“An error occurred while executing the command definition. See the inner exception for details.”)
[00:28:10] Exception: E0434F4D.System.Data.EntityCommandExecutionException (“An error occurred while executing the command definition. See the inner exception for details.”)

In this example, the solution will be as shown in Troubleshooting - 2.

Reference

Request Error – while Opening Orchestrator Web Services

The Orchestration Console cannot be opened after upgrading to System Center 2012 R2

[Orchestrator] Orchestration Console and Web Service are not working anymore

SCOM Web Console – "Web Console Configuration Required"

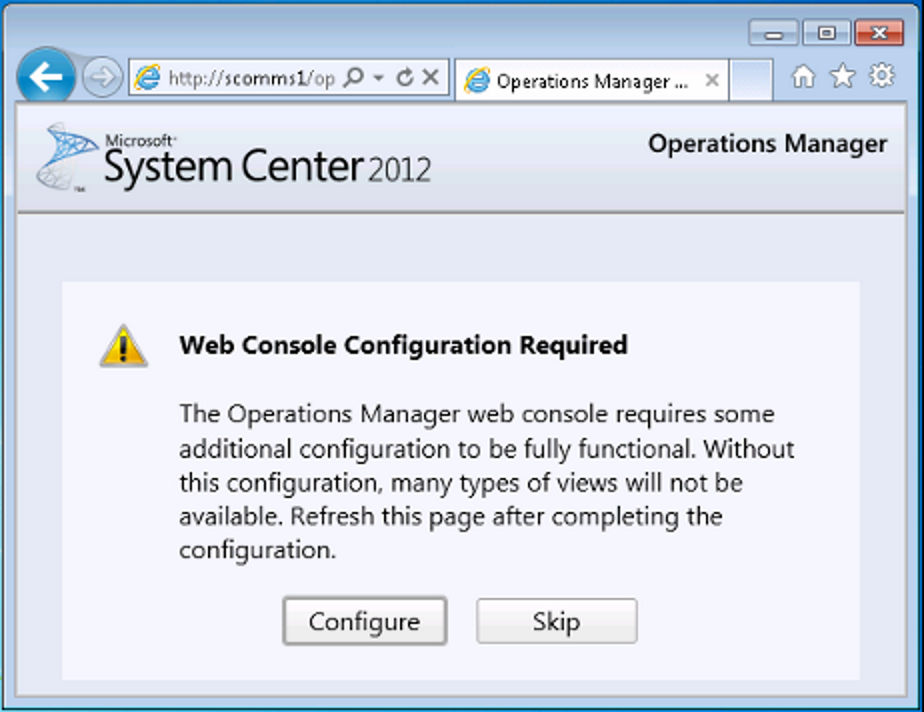
When opening SCOM Web Console, you may get the notification “Web Console Configuration Required”.

Normally you can click the Configure button (with SCOM Admin permission) and run the executable and refresh the browser window and you should see a web console login page next.

If you have run SilverlightClientConfiguration.exe but the problem still persists, you may want to continue with this article.

How to resolve the notification?

To find the way to resolve the notification, first we need to understand what SilverlightClientConfiguration.exe acutally does.

SilverlightClientConfiguration.exe actually does two things:

  1. Import the certificate to the store “Trusted Publishers”.
  2. Add the registry.
1
2
3
4
Path: HKLM\SOFTWARE\Wow6432Node\Microsoft\Silverlight
Value Type: Reg_DWORD
Key: AllowElevatedTrustAppsInBrowser
Value: 1

Now we know the story behind, we can do the same manually if the executable doesn’t work.

For more details, please refer to the article SCOM 2012 Web Console Configuration “NO LONGER Required!”.

It is a knonw issue in SCOM 2012 R2 UR12 and UR13

We have a known issue in SCOM 2012 R2 UR13 and UR14 that the dialogue will occur again after clicking Configure. In the two versions, SilverlightClientConfiguration.exe doesn’t import the certificate successfully.

Workaround

There is a workaround to resolve the issue. That must be applied to every machine where you want to open web console. The steps are actually a manual implementation of SilverlightClientConfiguration.exe.

  1. Click Configure in the dialog box.
  2. When you are prompted to run or save the SilverlightClientConfiguration.exe file, click Save.
  3. If you never ran SilverlightClientConfiguration.exe on the machine before, run it.
  4. Right-click the .exe file, click Properties, and then select the Digital Signatures tab.
  5. Select the certificate that has Digest Algorithm as SHA256, and then click Details.
  6. In the Digital Signature Details dialog box, click View Certificate.
  7. In the dialog box that appears, click Install Certificate.
  8. In the Certificate Import Wizard, change the store location to Local Machine, and then click Next.
  9. Select the Place all certificates in the following store option and then select Trusted Publishers.
  10. Click Next and then click Finish.
  11. Refresh your browser window.

SCORCH Web Service API

Web Service URLs

Web Service URL (no change for 2016):

http://sco01:81/orchestrator2012/orchestrator.svc/

Web Console URL:

http://sco01:82/

Get runbooks:

http://server01.contoso.com:81/Orchestrator2012/Orchestrator.svc/Runbooks

Access Orchestrator Runbooks via Web Service

Get a Runbook

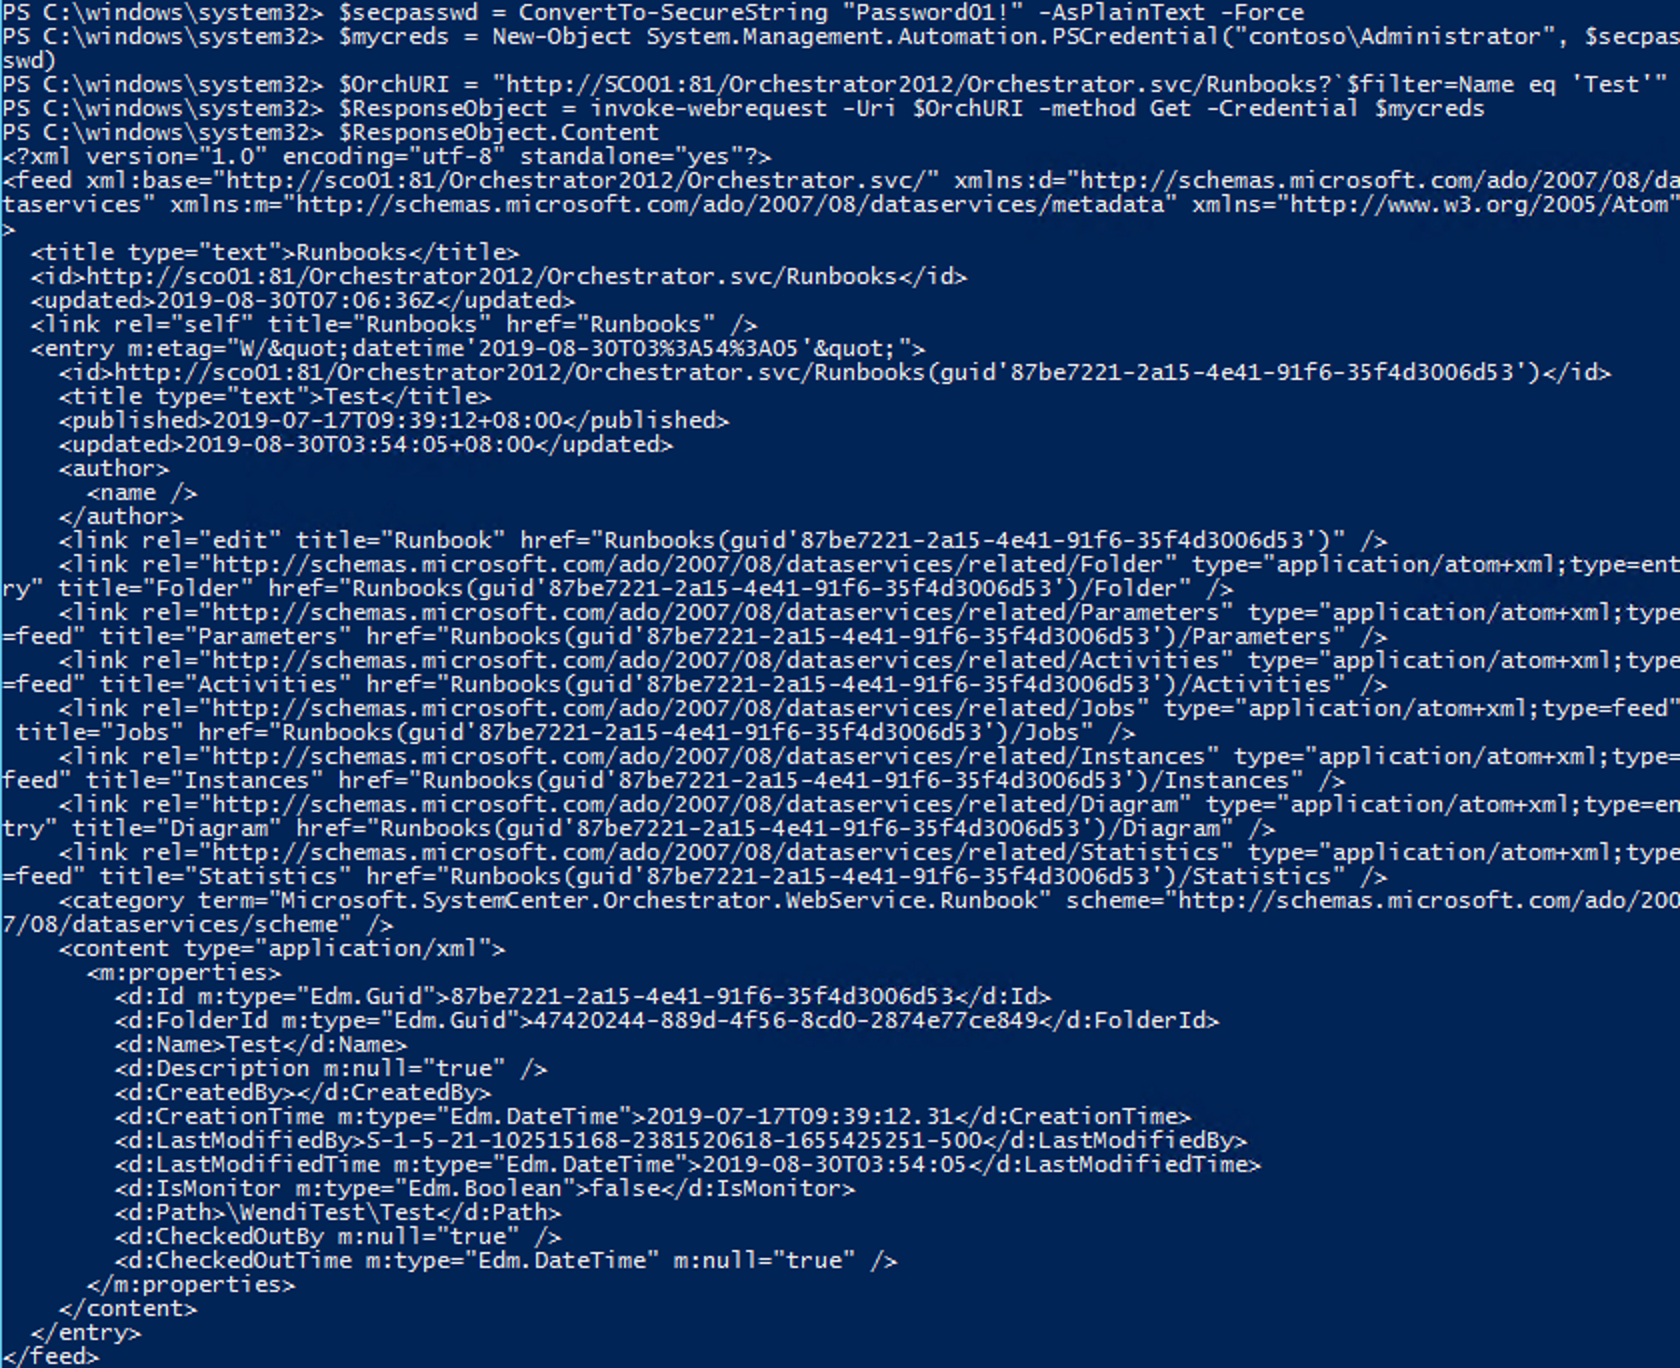
PowerShell
1
2
3
4
5
$secpasswd = ConvertTo-SecureString "Password01!" -AsPlainText -Force
$mycreds = New-Object System.Management.Automation.PSCredential("contoso\Administrator", $secpasswd)
$OrchURI = "http://SCO01:81/Orchestrator2012/Orchestrator.svc/Runbooks?`$filter=Name eq 'Test'"
$ResponseObject = invoke-webrequest -Uri $OrchURI -method Get -Credential $mycreds
$ResponseObject.Content

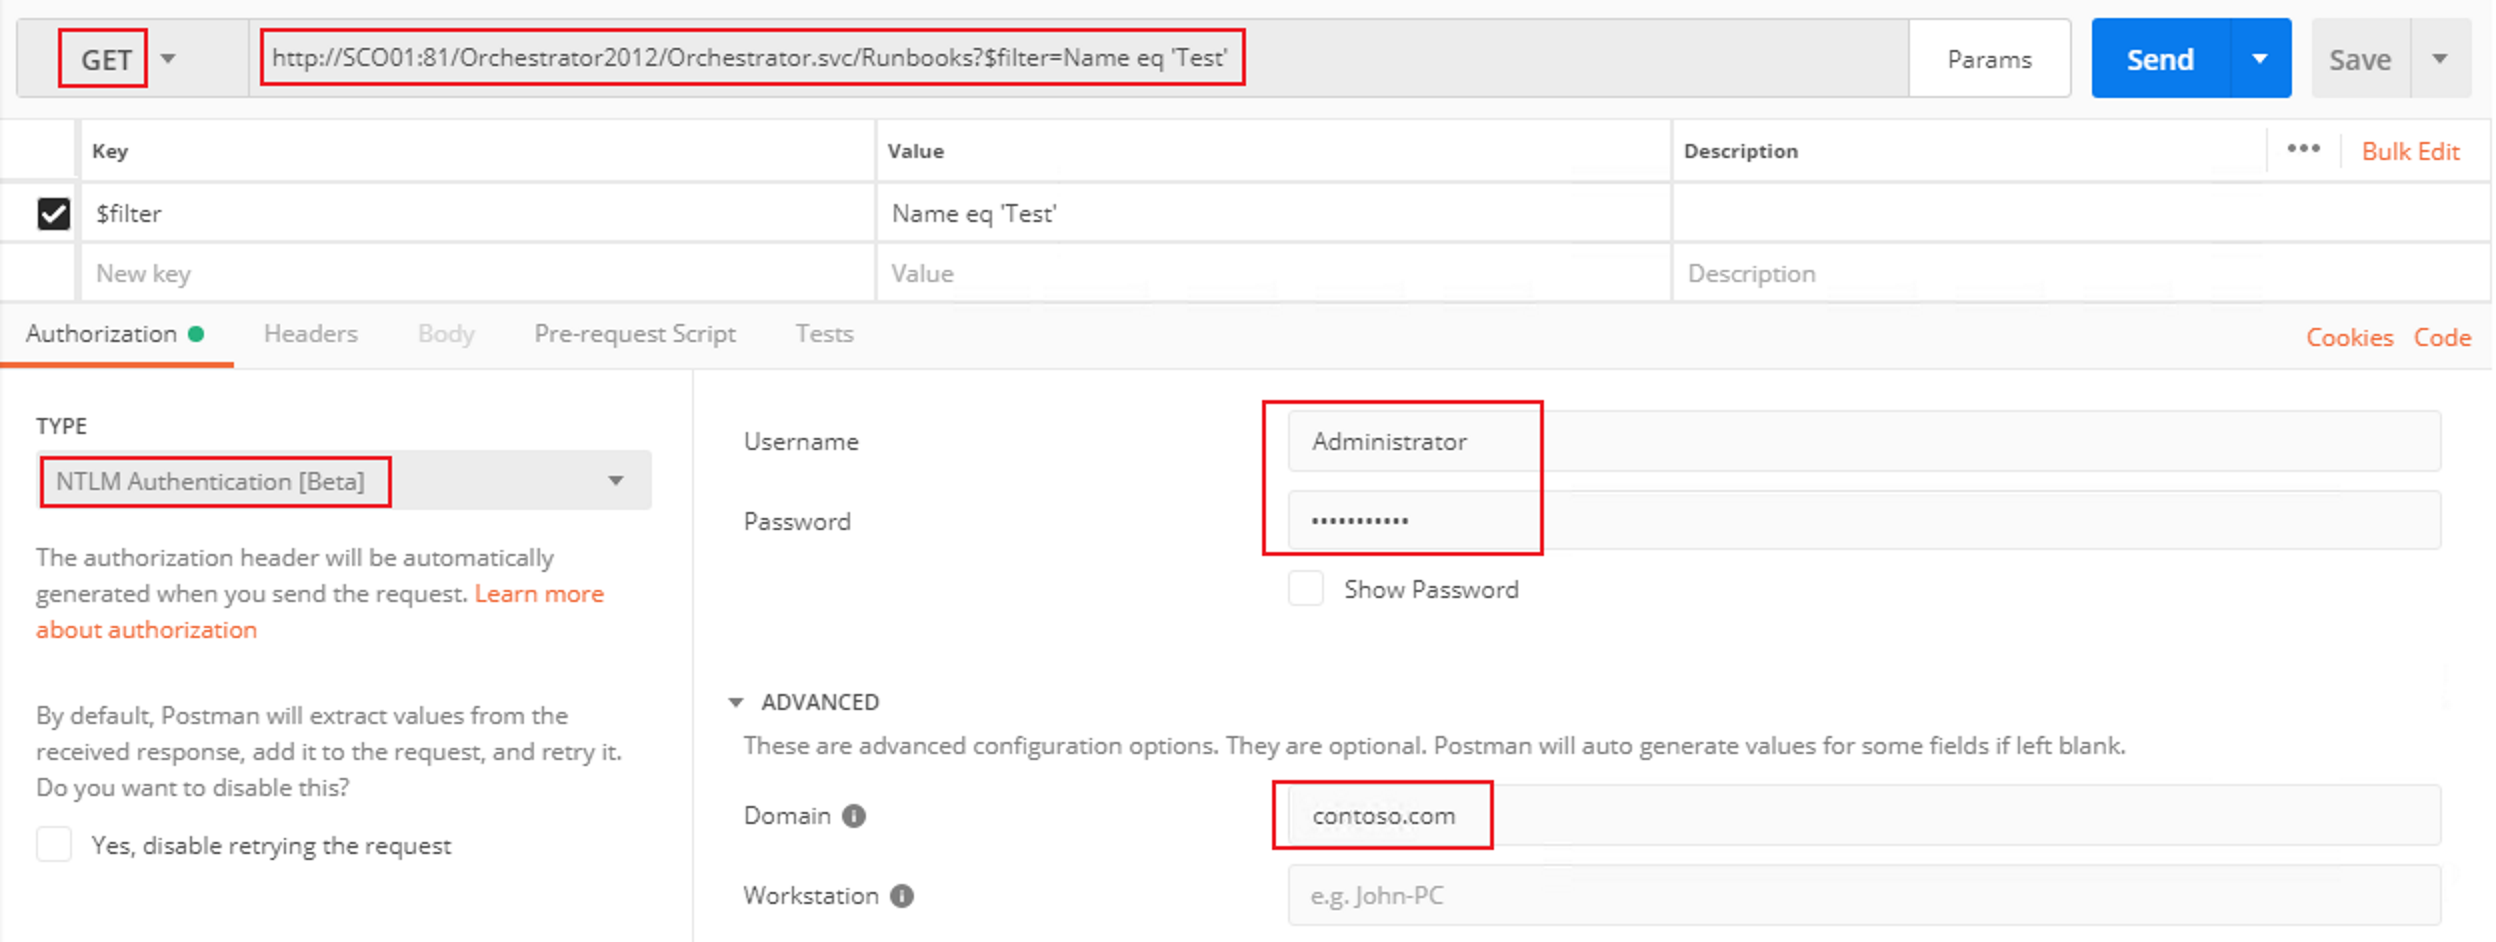
Postman
1
http://SCO01:81/Orchestrator2012/Orchestrator.svc/Runbooks?$filter=Name eq 'Test'"

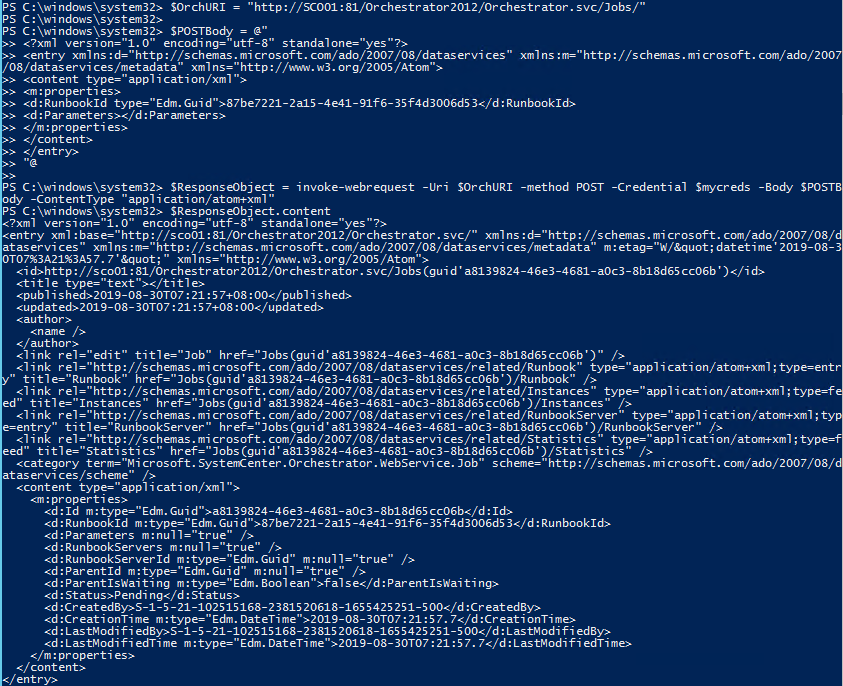
Start a Runbook

PowerShell
1
2
3
4
5
6
7
8
9
10
11
12
13
14
15
16
$OrchURI = "http://SCO01:81/Orchestrator2012/Orchestrator.svc/Jobs/"
 
$POSTBody = @"
<?xml version="1.0" encoding="utf-8" standalone="yes"?>
<entry xmlns:d="http://schemas.microsoft.com/ado/2007/08/dataservices" xmlns:m="http://schemas.microsoft.com/ado/2007/08/dataservices/metadata" xmlns="http://www.w3.org/2005/Atom">
<content type="application/xml">
<m:properties>
<d:RunbookId type="Edm.Guid">87be7221-2a15-4e41-91f6-35f4d3006d53</d:RunbookId>
<d:Parameters></d:Parameters>
</m:properties>
</content>
</entry>
"@
 
$ResponseObject = invoke-webrequest -Uri $OrchURI -method POST -Credential $mycreds -Body $POSTBody -ContentType "application/atom+xml"
$ResponseObject.Content

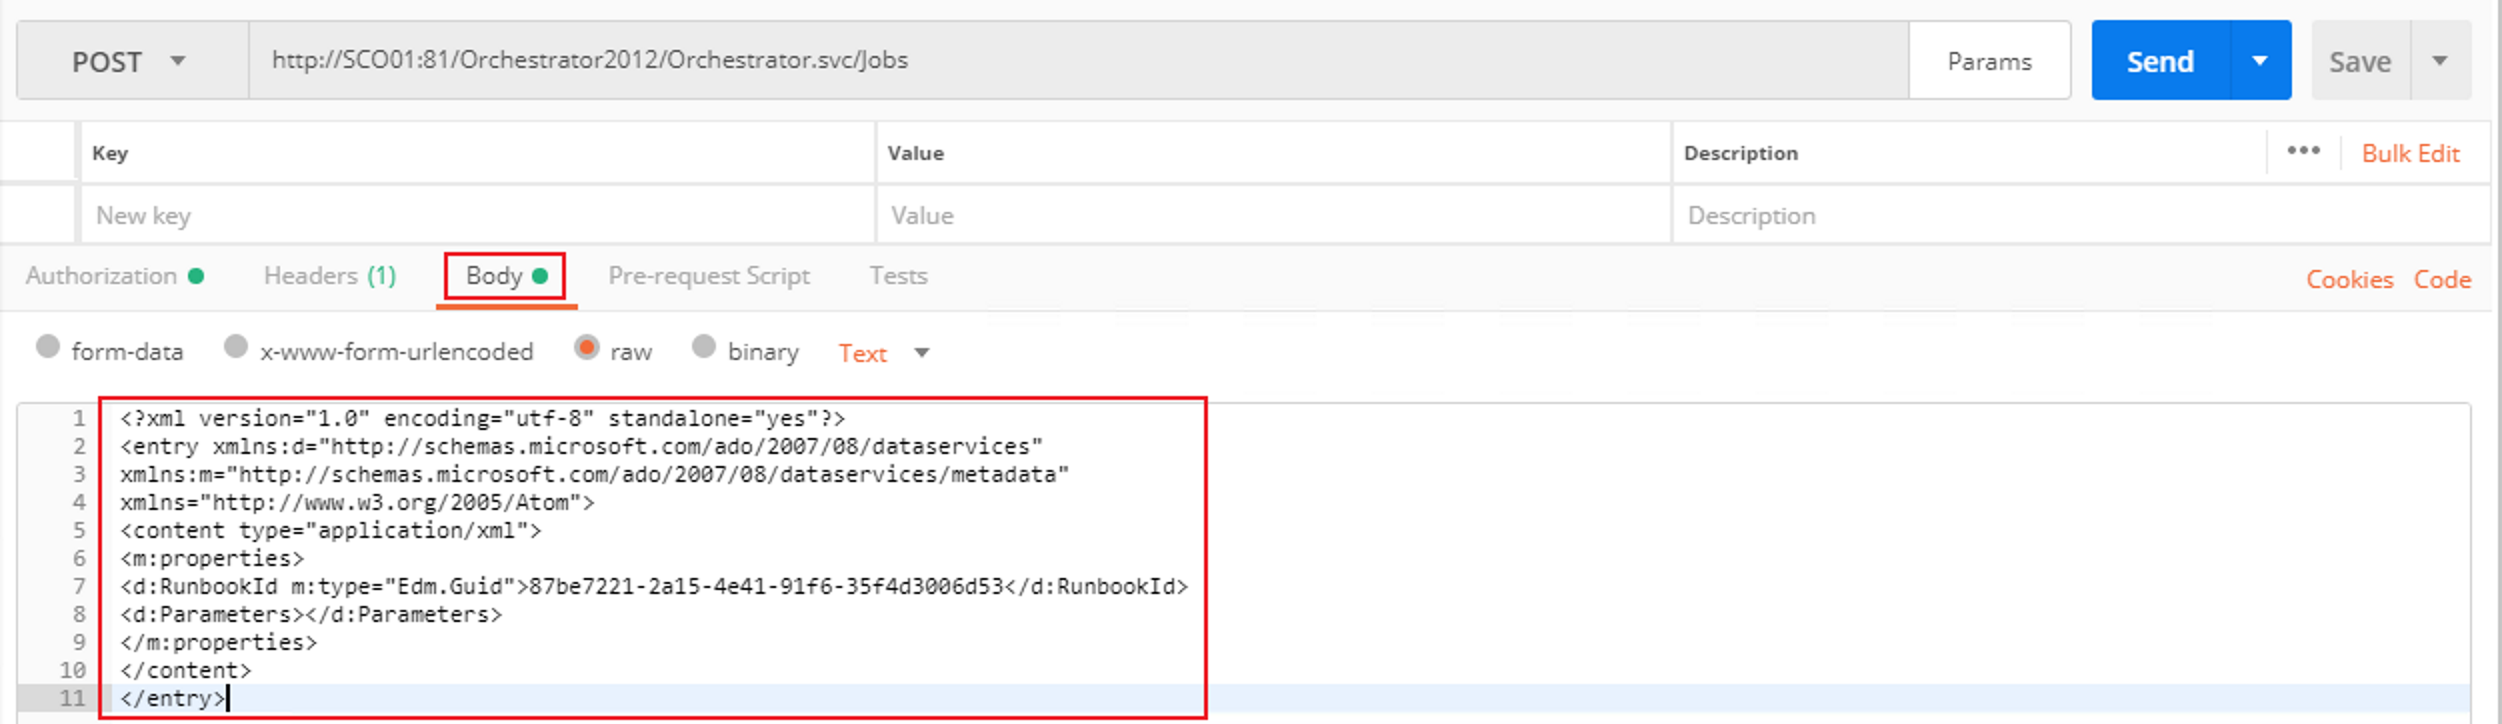
Postman
1
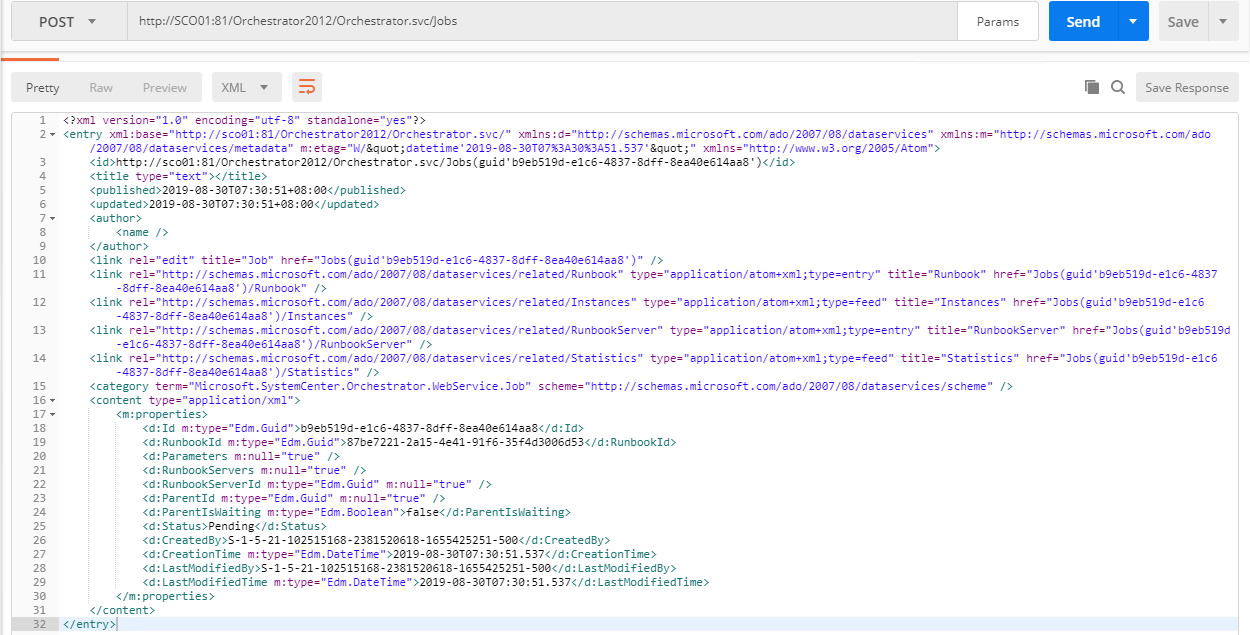
http://SCO01:81/Orchestrator2012/Orchestrator.svc/Jobs

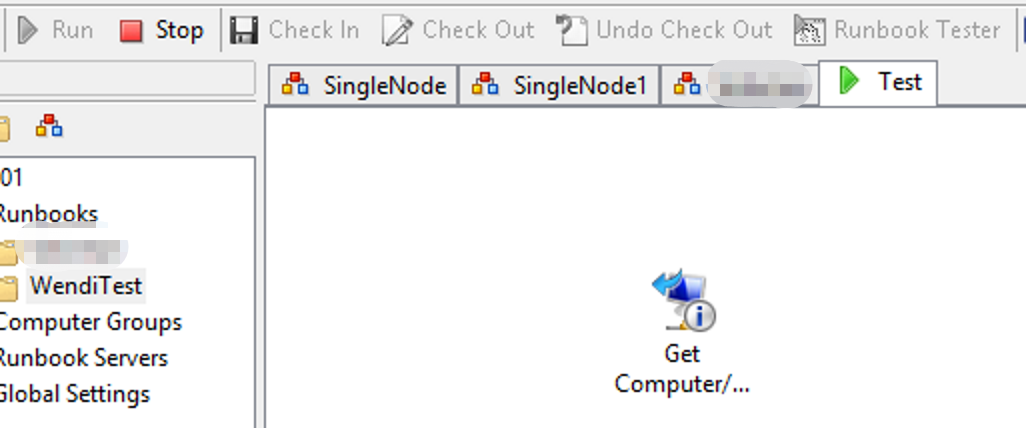
Confirm the runbook enters running status:

Reference

Accessing System Center 2012 Orchestrator Using the Web Service

Starting Runbooks and Stopping Jobs Using the System Center 2012 Orchestrator Web Service

Calling Orchestrator Runbooks (& retrieving output) via REST

Troubleshooting Gateway or Workgroup Communication Issue in SCOM

If you have deployed SCOM Gateway in your environment, or SCOM agent on a workgroup machine, but they can’t communicate with management server, you can refer to the following steps for troubleshooting.

Based on my experience, these troubleshooting steps can help resolve >50% of Gateway/Workgroup communication issues.

Troubleshooting Steps

  • Make sure Microsoft Monitoring Agent service is running, and Startup type is set to Automatic on management server and gateway/workgroup.

  • Check the gateway/workgroup status in SCOM console.

  • Check Operations Manager event log

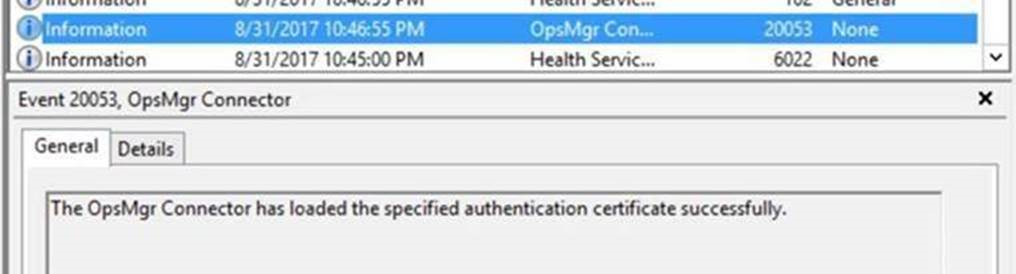
    If the certificate is recreated, we should find Event ID 20053 in Operations Manager event log on both the management server and gateway server/workgroup, indicating the certificate was loaded successfully.

If you find a related warning or error in event log, refer to this blog for explanation: [Troubleshoot workgroup/gateway issue with event log](https://techcommunity.microsoft.com/t5/System-Center-Blog/Monitoring-OpsMgr-workgroup-clients-Part-2-Installing/ba-p/350806)
  • Ensure port 5723 is open

    On gateway/workgroup:

    1
    telnet <Management Server FQDN> 5723
  • DNS

    Make sure that both sides are reachable via hostname (just ping). If it’s not working add the computers in DNS or in the Host file (C:\Windows\System32\Drivers\ETC\Host).

  • Check certificate

    Computer Certificate:

    1. Go to both management server and gateway server/workgroup, navigate to HKLM\Software\Microsoft\Microsoft Operations Manager\3.0\Machine Settings and check the value of ChannelCertificateSerialNumber.

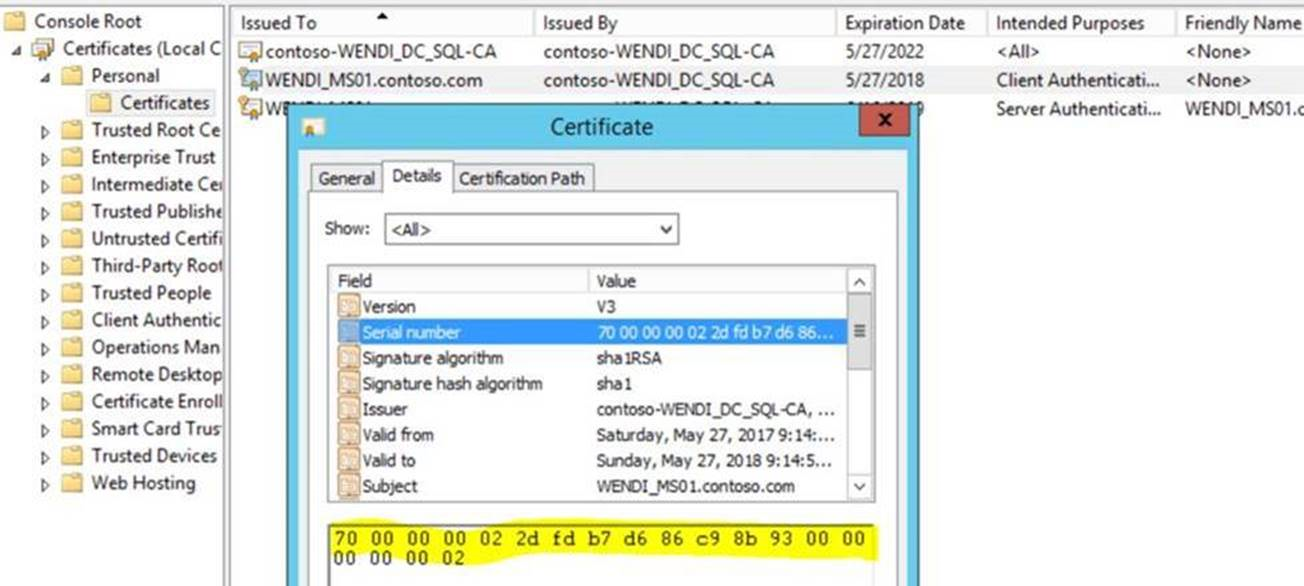
    Then, open mmc -> File -> Add or Remove Snap-ins -> Certificates -> Add, select Computer account, then Next and Finish. In Personal -> Certificates, open the certificate that you install on management server/gateway server/workgroup agent, click on Details tab and check the Serial Number. The Serial number and the registry value ChannelCertificateSerialNumber should match each other.

    1. Confirm computer certificates on both sides are issued by the same CA.

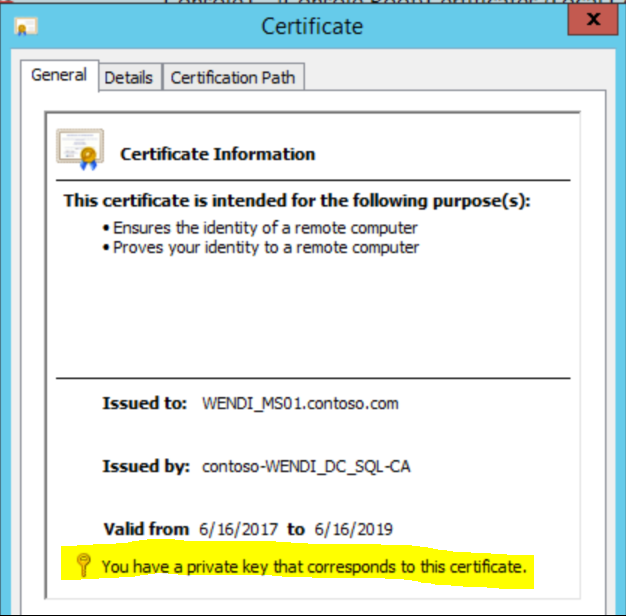
    2. The certificate must includes the private key.

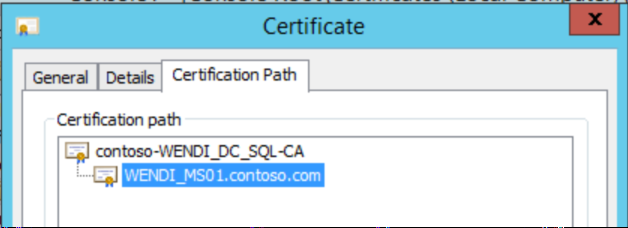
    1. The certificate must be trusted all the way to the root (Chain)

    1. The Common Name (CN) value in the certificate’s Subject field must match the FQDN of the computer where you imported the certificate.

    2. Ensure the certificate includes both Server Authentication OID and Client Authentication OID in the Enhanced Key Usage property.

    3. Check expiration date.

    4. Other comments:
      Hash Algorithm does not need to be same between source and target. (Ex. SHA1 on MS and SHA256 on GTW works)
      Key size can be 2048 and 4096.

    Trusted Root Certificate:

    Confirm trusted Root Certificate is well imported and can be found under Trusted Root Certification AuthoritiesCertificates. Check expiration date.

  • On the gateway server, go to HKLM\Software\ Microsoft\Microsoft Operation Manager\3.0\Server Management Group<MG Name>\Parent Health Services\0. Ensure the AuthenticationName and the NetworkName match and is FQDN of management server.

    In workgroup scenario, the path is HKLM\Software\ Microsoft\Microsoft Operation Manager\3.0\Agent Management Group<MG Name>\Parent Health Services\0

  • Ensure the assigned management server in Control Panel is correct.

  • Duplicate SPN

    On management server, identify the duplicate SPN. Any duplicate SPN’s will be listed.

    1
    setspn -x

    Delete the duplicate SPN

    1
    setspn –d <SPN> <object>

    Example:

    1
    2
    setspn -D http/daserver daserver1
    setspn –d host/fscluster member

Reference

Common issues when working with certificates in OpsMgr

When you try to install a System Center Operations Manager agent on a workgroup computer without using a gateway server, Operations Manager cannot see the workgroup computer

Changes of user relationship in AD can’t be correctly synchronized to SCSM

Issue Description

The relationship of users might be not correctly updated if related users were once re-named in AD or have duplicate records in DB.

Cause 1 – Known Issue: a renamed user in AD will be treated as a new object in SCSM

Symptom

There are multiple records for the same user in BaseManagedEntity.

Analysis

There is a blog talking about this kind of behavior.

I did a test in my lab environment (SCSM 2012 R2). After I rename a user in AD and run AD connector, there will be two objects co-existing in the table [dbo].[ManagedEntity] for the user, and two relationships in the table [dbo].[Relationship].

For example, after I change my user name from “wendi” to “wendii”, then to “wendie”, there are 3 user objects and 3 relationships in the DB.

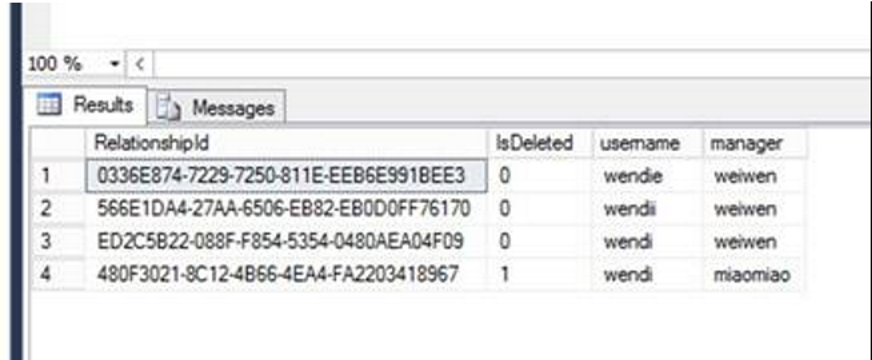
Relationship:

BaseManagedEntity:

Then I manually deleted “wendi” from DB, and changed the manager from “weiwen” to “Administrator” in AD. The relationship got updated for the newest object “wendie”, but not for the old object “wendii”. That resulted in two managers for the user “wendii”/”wendie”, which is actually the same user in AD.

Resolution

Firstly remove the duplicated users from [dbo].[ManagedEntity].

  1. If you don’t want to lose the relationships associated with the old object, please use the script in the blog to move all relationships from old object to new object.

Note: In the script there is a path pointing to SCSM PowerShell Module. You may need to alter it manually based on the real location.

  1. Remove the duplicate user object:
1
2
$oldADUser = "wendi"
Get-SCClassInstance -Class (Get-SCClass -Name "System.Domain.User") -Filter "UserName -eq $oldADUser | Remove-SCClassInstance

After confirming there is no duplicate user objects, please change the manager relationship in AD, then check if the relationship can be updated correctly by AD connector.

Cause 2 – Duplicate AD connector introduces duplicate user records

If there is only 1 record in BaseManagedEntity, but multiple records in [LFXSTG].[AD_User], it is probably from duplicate AD connectors.

We can check the data sources of the records in [LFXSTG].[AD_User]:

This query can give you information about all data sources (connectors):

1
Select * from LFX.Datasource

A sample output:

Resolution

Disable all duplicate connectors. After that, all users modified in the future could be correctly updated.

For those users which are already affected by the issue, we can follow below steps to process them.

  1. Run this query in ServiceManager to get the users who have duplicate relationships with relationship isDeleted = 0, as well as the connectors that brought the relationships.

(This query focuses on “manager” relationship)

1
2
3
4
5
6
7
8
9
10
11
12
13
14
15
16
17
18
19
20
21
22
23
24
25
26
27
28
29
Select distinct
u.DisplayName 'User Display Name',
u.UserName_6AF77E23_669B_123F_B392_323C17097BBD 'User',
Manager.UserName_6AF77E23_669B_123F_B392_323C17097BBD 'Manager',
r.RelationshipId,
r.IsDeleted 'Is Relationship Deleted',
C.DisplayName 'Connector',
BME.IsDeleted 'Is Connector Deleted',
R.LastModified
from Relationship R
left join RelationshipType RT on R.RelationshipTypeId = RT.RelationshipTypeId
left join MT_System$Domain$User Manager on manager.BaseManagedEntityId = R.SourceEntityId
left join MT_System$Domain$User U on u.BaseManagedEntityId = r.TargetEntityId
inner join DiscoverySourceToRelationship DSTR on R.RelationshipId = DSTR.RelationshipId
Left join DiscoverySource DS on DS.DiscoverySourceId = DSTR.DiscoverySourceId
left join MT_Connector C on convert(nvarchar(256),DS.ConnectorId) = C.Id
Left join BaseManagedEntity BME on C.BaseManagedEntityId = BME.BaseManagedEntityId
where RelationshipTypeName like '%System.UserManagesUser%' and u.BaseManagedEntityId in
(
Select
u.BaseManagedEntityId
from Relationship R
left join RelationshipType RT on R.RelationshipTypeId = RT.RelationshipTypeId
left join MT_System$Domain$User Manager on manager.BaseManagedEntityId = R.SourceEntityId
left join MT_System$Domain$User U on u.BaseManagedEntityId = r.TargetEntityId
where RelationshipTypeName like '%System.UserManagesUser%' and r.IsDeleted = 0
group by U.UserName_6AF77E23_669B_123F_B392_323C17097BBD, u.BaseManagedEntityId
Having count(u.UserName_6AF77E23_669B_123F_B392_323C17097BBD) > 1)
order by U.UserName_6AF77E23_669B_123F_B392_323C17097BBD
  1. Use below steps to automate the removal of un-needed relationships whilst keeping the most current one.
  • Copy the query result with headers and save as a .csv file.
  • Remove the needed relationships from the .csv file.
  • Use below PowerShell commands to remove the un-needed relationships.
1
2
3
4
5
6
# You may change the file path.
$listcsv = Import-Csv C:\Files\UnneededRelationships.csv
foreach($list in $listcsv)
{
Get-screlationshipinstance -id $listcsv.RelationshipId | remove-screlationshipinstance
}